How to Site Measure and Survey
As a designer we have numerous processes that we have to go through, or routines you may call them. The site measure and survey is one of the most important routines for you to memorize.
It is crutial for the design process to be able to progress acurately. We need to have correct blocks for us to build on, meaning we have to have all the data in front of us so that we can accurately design and decorate the space.
So the first place to start on a project is with a site measure, so you can gather your information and be familiar with the space you have to work with.
You will need a good sturdy retractable metal tape measure, paper (graph paper if you feel you can’t sketch straight!) a clipboard and 2 or 3 different coloured pens.
Here is what you do next:
1. Walk around the room (or rooms) and familiarize yourself with the environment.
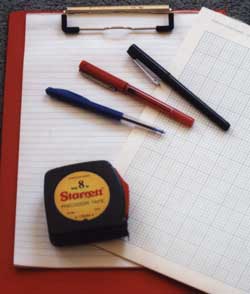
Clip board, 3 pens, paper and a measuring tape.
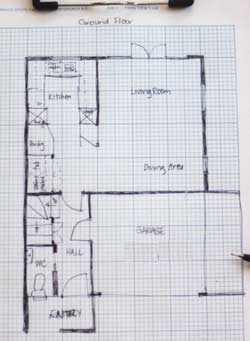
2. Take your pen and paper (on the clipboard) and start to draw the outline of the room (rooms). Show every opening i.e. windows and doors, and positions of any fixtures i.e. fireplaces, kitchen benches,
WC’s.
Show the relationship between the rooms, and label each. Make sure you have enough space around the outside to show your measurements.
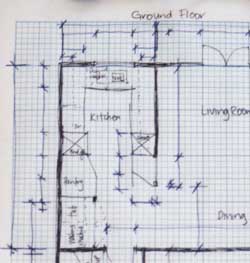
3. Select a different colour pen. This helps later, as you will have a lot of information on the paper when you need to decipher it to draw.
We are now going to show the dimension lines. (Dimensions are – the measured distance between two points, a definite measure shown on a drawing: the size of a room or building, as the length, width and height: also the size of the building material given in length, width and thickness.)
Work out which dimensions you will require to be able to draw the space. (Think ahead as you don’t want to go back to do it again.)
Always take an overall dimension as well as the individual dimensions.
It is very easy to write something incorrectly, if you have the overall dimension you can work backwards to figure it out.
Sketch with walls and room names
Sketch with dimension lines prepared, and room names noted
Take the measuring tape and start measuring. Always measure in millimeters,ie 1200 (this equals 1.2 metres) and keep the measurements consistent.
If not you can easily confuse 1.2 with 12 etc. (If you use the imperial system then use inches) It is often easier and quicker if you have someone to hold one end while you read the measurement and they write it down.
If you have to do it yourself, place the tape on the floor where practical, as there is less movement that way.
4. Select the remaining pen, now we want to note all the electrical and lighting information. Show where the light switches (note if they have dimmers), power outlets, security systems, speakers, heating control panels, meter boards, switch boards, wall lights, pendants, recessed light fittings and any other item that you see necessary. Show this on your sketch that you have drawn.
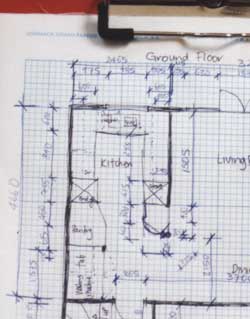
Sketch with measurements and dimensions
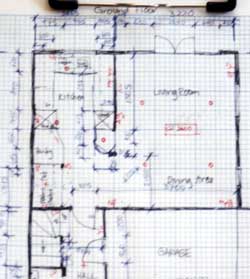
Sketch with ceiling heights in red pen, light fitting positions, power outlets, light switches etc.
5. Once you have completed these tasks (and it does take a long time, especially the first time!), you need to take some heights. This will enable you to draw elevations when the time comes.
On your sketch of the layout, show a triangle and number it facing each wall that has an opening or a fixture that you need to know the information for.
On a fresh sheet of paper, and back to your original colour pen, start with the first number and stand facing that wall. Project the image that you see onto the paper (an elevation). Show the position of the windows, doors etc.
Then show a dimension line to the heights that you will require to draw this elevation. You will need depths and thickness if you are going to build things around existing items.
Ensure that you also have the ceiling height. (This can be shown on the first sketch that you have done with the dimension enclosed in a box) 2400. Continue for all the other walls you think necessary.
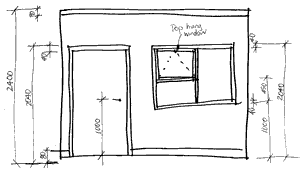
Wall elevation with dimensions of heights
6. Take a fresh sheet of paper and write notes on where north is, any indoor/outdoor features, the existing finishes, i.e. tile floor, carpet, vinyl, timber paneling to walls, any special features i.e. ceiling roses, picture rails, door hardware. Sometimes it’s very helpful to take photographs or a video of the site to use as a reference when you start to draw. If you are dealing with an older house, it pays to check for defects, this means that you can itemize these to be repaired.
Now that we have gathered all this information, where to from here?
You draw the space to scale using a drawing board and set square or you can use graph paper. With the information you have gathered you can draw the existing floor plan, electrical layout, elevations and ceiling plan. From there you can plan what alterations you would like to make.
For information on drawing
